The LG WM3431HW is a really cool and super-efficient combined washer/dryer unit, but sadly it lacks a lint filter, and over time it will stop drying well as it fills up with wet lint clumps internally. This is a guide to how to remove the lint from a LG WM3431HW yourself rather than calling a repair person or consigning it to a landfill for a very fixable problem. I wrote it because I couldn't find much info online on troubleshooting or how to clean it out, and it seemed like everyone was having to resort to either calling someone to clean it out for them, or assuming the machine was defective and replacing it. Note that while it is no longer made, a very similar process applies to the more recent models (WM3488HS and WM3488HW).
NOTE: This page is just a description of a technique that I used, and is NOT guaranteed or formally recommended. While it is based on what a repairman showed a friend of mine when he cleaned out his unit, doing this on your own is potentially risky and almost certainly voids your warranty. Proceed at your own risk!
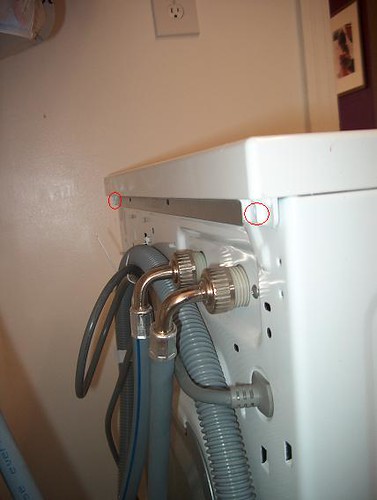
Step 1When your drying starts to take longer, you should consider opening it up to check for lint balls. First, unplug the machine. Next, remove these two screws in back (circled in red, but they're the only two screws at the top of the back of the machine). This will allow you to slide off the top of the machine (towards the back). If you don't want to move the dryer, you should be able to feel them with your fingers, they're between two small vertical plastic walls.
Step 2
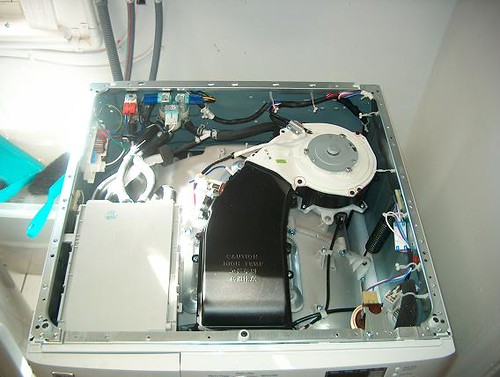
Remove the 9 screws (3 in back, 2 on each other side) that fasten this metal sheet with a black mat on it to the frame (circled in red), ignoring the 3 screws in plastic housings in the front. This will let you remove this metal sheet (you may want to wear heavy gloves, as the sheet is sharp).

Step 3
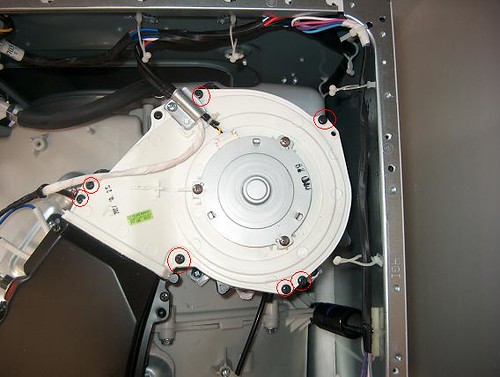
Next, remove the screws that fasten the white plastic cover to the tube where lint accumulates (see detail pic below).
The picture below shows a detail of the white plastic cover to remove, and which screws you need to take out (there are 6, one of the ones on bottom left is actually a bolt I mistakenly circled). Once they're out you can flip the cover to the side, being careful not to pull out the wire which will stay attached to the bottom left corner.
Step 4
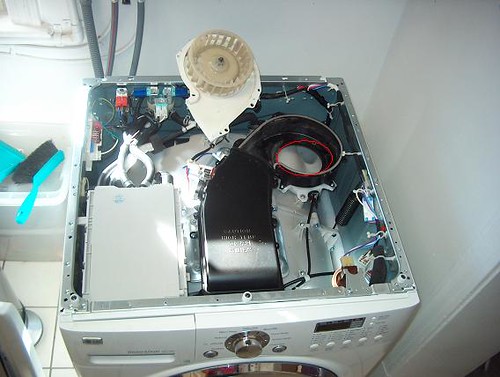
Now that you have exposed the tube that accumulates lint, you can actually clean it out to remove big wet balls of lint. Be careful! I tried using a coat hanger and got it quite stuck for a good long while, so I would try a manual drain snake / augur, or a "Zip It" tool, or something similar instead which is easier to remove but is still good at hooking the lint. There is a video showing how to use a Zip It to remove the lint that you may wish to watch on YouTube. With my newer model (WM3488HW) I also always go a step further and open the black plastic cover for the heating element, which allows me to remove dog hair that accumulates along the heater and causes a burning smell when the dryer is used for long enough.
Once clean, reassemble the machine by putting all the parts back where they were. Enjoy a more efficient machine!
If you like this page, feel free to thank me by donating to The Nature Conservancy, or start doing some vegan cooking. Good luck!
-Jon